Hiking Mt Everest – When to Go, How to do? Detail Guide
Hiking Mt. Everest and reaching the summit has become a bucket list item for every adventurer. Indeed, hiking Mount Everest is demanding and requires much time and money.
Mount Everest is the world’s highest mountain, known as the Sagarmatha in Nepal and Chomolungma in Tibet. It has an elevation of 8,848.86 m (29,031.7 ft) above sea level. This height was recently announced to be in 2020 by the Chinese and Nepali authorities. Climbers are attracted to reaching the top of Everest. However, to do so, highly experienced mountaineers are needed for guidance and a lot of money. Climbers must pay between $35,000 and more than $100,000, covering nearly all the costs of climbing Mount Everest.
Many trekkers can only reach Everest base camp, which may be reached in 11 to 15 days from Kathmandu. It is less expensive than climbing Mount Everest. However, hiking Mount Everest is not as simple as it seems because there are risks involved, such as altitude sickness, bad weather, wind, avalanches, and dangers from the Khumbu glaciers.
Despite all the risks, people are drawn to the mountains’ beauty and peacefulness. Like that, I had the opportunity to go on a 13-day hike to Mount Everest with some of my friends. If I’m being sincere, these 13 days were the best of my life and beyond anything I could have imagined.
Hiking Mount Everest is necessary for anyone who considers themselves adventurous, loves to trek, is a travel vlogger, or wants to create an excellent trip series. I’ll provide you with the most comprehensive information on hiking Mount Everest. This post will provide details on trekking Mount Everest, including costs, what to pack, an itinerary, the ideal time to go, and frequently asked questions.
Remember that I am sharing all this information based on my Mount Everest hiking experiences and reliable sources.
Hiking Mt Everest: Budget
Since hiking Mt Everest is a costly expedition, you should budget for it. Knowing what to carry is crucial for packaging appropriately for a prolonged trip.
This hiking mt Everest trek will take 10 to 15 days because it is so long. It would help to have enough spare time to finish the trek. So, you may follow my way, and it will be pretty simple for you whether you’re planning to go alone or with a group.
The cost of hiking the Mt Everest trip’s price will be first because reaching every base camp requires a pricey hike. So, to begin, I’ll give a rough estimate of the cost of this trip and explain how I could pay for it. One must plan and prepare for this expedition with a reputable travel agency to hike Mount Everest. If you embark on this trek with a group, the cost will undoubtedly be higher.
Therefore, hiking Mt Everest costs from USD 1600 to USD 3200, depending on the package. This includes the Lukla flight; you must fly from Kathmandu to Lukla. Since doing so would extend your trek’s duration, neither traveling by road nor by foot is an option.
Since there is a trek along the way, getting there by vehicle takes at least three days because the final destination lacks a motorable road. Therefore, you must fly from Kathmandu to Lukla. However, you can adjust your budget slightly if you decide against traveling on a budget or standard options.
Trekking Time
But, if I’m being sincere, because this is a high-altitude journey that takes 12 to 15 days to complete, there will undoubtedly be additional costs. Your guide will pay for your ultimate expenditures, including meals, trekking supplies, and a guest house. You will have to spend more on your expenses.
However, if I go again or recommend someone, you can use Above The Himalayan Trekking. Making the hiking Mt Everest itinerary will be a lot of fun. In most places, itineraries are rather basic, but you’ll have a lot of fun arranging and budgeting them. However, there is a price for everything.
This is true regardless of the lodge you stay at or the food you eat; the price is the same everywhere. And as you get higher, everything will cost more, including food and lodging.
You will be charged additional fees for every comfort factor, even for charging your phones and cameras. Therefore, there are extra expenses in addition to the fact that lodging costs are always between USD 8 and 15 for a normal one; luxury lodges are much more expensive, regardless of the hotel where you stay. It would help if you ate at the inn where you are visiting; thus, that adds to your overall budget.
A permit from Kathmandu is required, along with food and lodging for the journey. In addition to the hike fee, you will need to pay an additional fee to enter the Sagarmatha National Park. Before you start your trek, you’ll invest in gear because you’ll need the essentials, such as bags and trekking poles.
[contact-form-7 id=”4615″ title=”inside”]
Hiking Mt Everest: What to pack?
What should you bring with you? That is the topic of my following discussion. Thus, I have created a thorough list of things to pack to ensure you have everything you require. This is a short list, but you should do everything on it. Additionally, if you wish to bring along some extra items, you can do so.
While traveling, the group I was with instructed us to keep two bags: one day bag and one duffle bag. Everything we carried during the day was in the day bag. Additionally, they included the duffle bag with the hiking arrangements for Mt Everest.
Likewise, duffle bags had all the items we didn’t need for the walk, such as warm clothing, socks, and a fleece jacket. The duffel bag’s maximum weight is 12 kg, depending on the airline you’re flying with and the porters. Therefore, you need to exercise caution about the load you are carrying. However, I believe 12 kilograms is adequate for a trekking bag. The items on my list, in order of priority, are:
A sleeping bag is necessary for hiking Mt. Everest because the blanket provided at your accommodation is insufficient. It gets colder as you get higher, which is challenging to handle. Therefore, bringing a sleeping bag is essential for keeping warm. Ensure the sleeping bag you purchase has a -8-degree Celsius certification. If not, you will freeze in the extreme cold and be unable to endure. As a result, it ought to be able to survive at -8 degrees Celsius.
Trekking boots: Your hiking experience will be very unpleasant without trekking boots. Therefore, you must ensure that you have sturdy hiking boots.
Running shoes/sports footwear: Besides trekking shoes, you should keep running shoes for daily activities while staying at a lodge between hikes. Walking in hiking shoes makes your feet quite sweaty and heavy, so you should wear running shoes to give your feet a break.
Slippers: You should always have a pair of slippers with you. So that you can use the restroom or go for a walk while you’re not hiking.
Full-down jacket: Wear a down coat to remain warm if you feel cold.
Fleece Jacket: You should own at least two pairs of fleece jackets.
Raincoat: Some trek days will also rain. To be prepared, carry at least one rain jacket.
Thermals (2 pairs): Bring thermals along if you want to stay warm. There should be enough thermals to survive the entire trek on top and bottom. Therefore, you should also bring three to four pairs of thermals with you.
Full-Sleeves Dry Fit T-Shirts (2-3 pairs): Pack full-sleeve dry-fit t-shirts among your other apparel items. You should wear dry clothing because you’ll naturally sweat a lot. These dry-fit t-shirts will be pretty helpful because they dry quickly. Even though the first several days of the trek will be sunny, you still need to wear full-sleeve t-shirts So that you won’t promptly burn in the sun.
A Poncho: If you don’t want to invest in a rain jacket, a poncho is a less expensive option. A shawl can be draped over your head and wrapped around you. A hood will be present along with it. Ponchos are necessary for all treks, not just those up Mount Everest.
Trekking pants (3–4 pairs): Trekking pants are best used at higher altitudes when there is a greater risk of sunburn. It is advisable to pack both full and half trekking pants. When hiking at lower altitudes, where it may be hot, shorts and trekking pants are needed. Alternately, you might get a pair of trekking pants that can double as shorts by simply opening knee-level zippers. Traveling with these lightweight trekking pants is reasonably practical because they are not heavy, and the material is somewhat waterproof.
Woolen cap
Water-resistant gloves (carrying waterproof gloves is a must and helpful).
Cozy or warm gloves ( carry extra woolen gloves to wear underneath the gloves.)
Clean socks (4-5 pairs): If your hike is about to last 11 days, please carry 11 pairs of socks. It is better to wear clean socks all day of your hike.
Woolen socks (2-3 pairs): Also, carry 3-5 pairs of woolen socks so you don’t freeze.
Clean Undergarments
Accessories
After this, we reach the crucial category of accessories.
Headlamps: Headlamps are an underappreciated but crucial piece of equipment for hiking. So, if it’s nighttime or you’re going on a nighttime hike, a headlamp that fits around your head will come in handy.
Trekking poles: bringing two of these is always a good idea. As you ascend, you become more aware of your need for trekking poles.
Buff: It acts as a mouthguard. So that you won’t be too bothered by the sun and the trek’s dust.
Sun hat: You must also wear a sun hat with a wide brim. Your face and neck will be shielded from the sun and given protection.
1 L Bottle: You should usually carry a 1-liter bottle with you. I realize it adds to the weight, but having a lot of water with you will be necessary to keep your body hydrated during the hike.
Camel Back Bottles: Water can be consumed while trekking with a camelback bottle, which goes on your back. It’s a beneficial tool because you must drink at least two liters of water daily on this walk. Since you’ll be rising and ascending, the more, the merrier. Camelback bottles are typically used to store water to keep your body hydrated.
Lifestraw filter bottle: If you wish to drink pure water, you can always carry a Lifestraw filter bottle with you.
Using cosmetics: Getting a face on the trek will be crucial, so include lip balm, body lotion, moisturizer, and sunscreen. Your skin will dry out quickly since the climate has little moisture and intense sun. Your skin will dry out quickly, begin to crack and cause discomfort in your lips. So, using these products can be helpful.
Trek Bag: You need the bag to carry everything you need on the hike to Mount Everest. You can choose between a smaller size with good capacity and a larger one you can have during the day. Although challenging, you can choose a bag that you feel is acceptable for you and will allow you to carry everything with you for the duration of the trek.
Protein-rich snacks: It’s best to carry more protein-rich snacks than you need in your backpack or another duffel bag. You’ll start feeling hungry during the hike, which helps you refuel. Therefore, packing these protein bars will keep you full and give you the desire to eat while hiking. Accordingly, always pack two to three protein-rich snacks or bars in your day bag and store all extras in your duffel bag.
[contact-form-7 id=”4615″ title=”inside”]
Hiking Mt Everest: Itinerary Details
Regarding the trek’s itinerary, I have listed the names of every location mentioned above and their heights. Eventually, you’ll gain a greater understanding of these locations. What will occur at each stage? What will the environment look like? How will the altitude change?
We are trekking to Kalapathar and Everest base camp. The immigration procedure is simple, and visitors who have not already applied online can obtain an on-arrival visa at a self-service visa kiosk at the airport. The hike to Everest base camp begins from the airport in Kathmandu and lasts at least 11 to 13 days. Following immigration and baggage claim, you can leave for the ground transportation area. There is also a service for pre-paid taxis.
Day 1: Arrive in Kathmandu (1400m)
You arrive in Kathmandu on the first day and spend the night there. On day 2, you take a domestic flight out of Tribhuvan International Airport to start your journey in Kathmandu on day 2.
Day 2 Lukla 2860 m – Phakding (2610 m)
You fly to Lukla the following day to start your hiking trip to Mt. Everest. Another alternative is to take a bus to a nearby town and then hike to Lukla. However, if you want to travel by road, it will take three days to get to Lukla. Therefore, it is preferable to fly domestically from Tribhuvan International Airport.
Tickets are highly booked. Therefore, it’s best to reserve them in advance. There are times when no flights are offered. So, if you’re thinking about taking this journey, please book your tickets in advance.
Most flights to Lukla depart early in the morning because there are often strong winds in the afternoon. Once you have completed the security procedures, you will board the plane for Lukla. It will take approximately 45 minutes to reach Lukla. From above, you will see stunning views that gradually transition from urban to rural areas. Many mountains, valleys, rivers, and other natural landscapes are visible. As we approach the Khumbu region, the hills can be seen getting closer.
The runway at Lukla Airport is short and slants uphill to allow landing planes to slow down quickly. Because of its high runway and quick width, Lukla is one of the riskiest and scariest airports to land. Therefore, you will travel to Phakding when you arrive in Lukla.
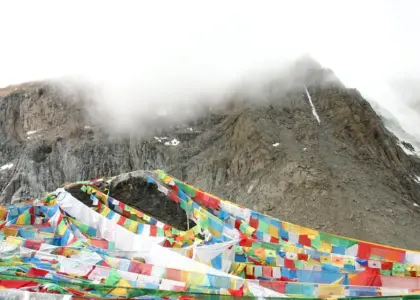
The first night’s stay follows a three-hour climb to Phakding. The site has numerous monuments, prayer wheels, and Buddhist prayers carved into rocks. Yak and horse hybrids are essential for transporting necessities in this region.
You can observe hotels, restaurants, pharmacies, and other shops providing necessities along the trail. There are a few hospitals; when necessary, medical evacuation helicopters frequently arrive within 10–15 minutes. The paths are well-kept, and the steps were built recently due to landslides. As we travel between Benkar and Manjo across Dudhkoshi, we follow the paths toward our lodges in Phakding.
Trekkers can formally enter the Sagarmatha National Park after Manjo. We were granted permission to hike to Mount Everest base camp after paying the required costs and registering the phone number.
The trekkers have been in Phakding for the second day. After traveling by foot for around three hours from Lukla, they often spend the first night of their journey there.
Day 3: Phakding to Namche Bazar (3340m)
The next day, after Phakding, you go to Namche Bazaar, which is, by far, one of my favorite places to be. Trekkers spend their second and third nights of the journey at Namche Bazaar after Phakding. Due to the significant altitude gain, staying two nights in Namche for acclimation is advised. The terrain is relatively steep until we reach Namche market after we cross the Hillary Bridge.
The third day of the trip involves staying at Namche Bazaar. It is a tiny city with practically all its amenities at your disposal. The town of Namche is generally quite crowded with tourists. In this area, lodges provide heated common areas and facilities for hot showers.
Day 4: Rest Day at Namche Bazaar or Acclimatization hike to Everest View Hotel and Khumjung
At Namche Bazaar, day four was designated as an acclimatization day because you must take a day off after gaining a particular altitude to adjust. This is crucial at higher elevations because neglecting to unwind or acclimate might lead to sickness. It is useless to enjoy a trek so much that you end up sick and unable to complete it. Without a doubt, you want to enjoy yourself while hiking. Therefore, acclimatization is essential.
On the other hand, the trekkers typically go on an acclimatization trip to the Everest View Hotel or to Kumjung the following morning. Around Syanboche, yaks and yak hydrids can be seen grazing. As the altitude rises, the hike gets more challenging since less oxygen is available. We headed to the trekkers’ perspective terrace of the Everest View Hotel.
The vistas are breathtaking. Kumjung is situated at a higher altitude than Namche but slightly lower than the Everest View Hotel. Syangboche has a government-owned yak farm and an airport that is not operational.
Several inches of snow are expected in March at elevations higher than Namche. However, there was only a little snowfall when we were there.
Day 5: Namche to Debuche
On day 5, after spending day four getting acclimated, you travel to a location named Debuche. You may discover the ancient monastery at Tangboche, which dates back to 1916 and was built at a height of 3870 meters.
Day 6:Debuche to Dingboche (4410 m)
Debuche is a one-night hike. You stay the night and leave for Dinboche the following morning. As we proceed, the mountain gets closer and closer.
Day 7: Rest day at Dingboche and Hike to Nagarsang peak
Due to a significant altitude rise after two days of trekking, one day in Dinboche will be a rest day. Once you get to Dinboche, you’ll understand how crucial rest is. It was necessary because hiking at higher altitudes is quite tiring.
On the rest day, an acclimatization hike to Nagarsang Mountain is advised. The round trip takes roughly two to three hours.
Day 8: Dingboche to Lobuche (6119 m)
Our hiking Mt Everest journey gets progressively colder as you increase in height. The river has some ice on it and is partially frozen. All around you are mountains covered in snow. Memorial monuments have been erected to honor the Everest climbers who died at the site known as Dukla. Lobuche is the next overnight destination after Dingboche.
Take a short excursion off the trail to visit the Pyramid International Laboratory/Observation, a high-altitude research facility. The laboratory roof is made of solar panels, giving it its common name.
Day 9: Lobuche to Gorak shep (5164 m) to Everest base camp (5364 m) and Night stay at Gorakshep
The last settlement with food and lodgings is called Gorekshep, situated at the base of the Kalapathar. On the same day, you’ll climb towards Everest base camp (5364 m) following lunch in Gorakshep. Getting to Gorak Shep and Everest base camp requires a long day of trekking. Upon arriving at Everest Base Camp, you will be overjoyed to reach your destination.
The fact that you will realize you have reached the maximum altitude by the time you arrive at Everest base camp makes it a challenging portion of the journey. After base camp and raising the flag there, this is likely one of the most strenuous and lengthy days. After snapping pictures and enjoying the scene, you return and spend the night at Gorak Shep.
Day 10: Kala Pathar (5643 m) – Pheriche (4371 m)
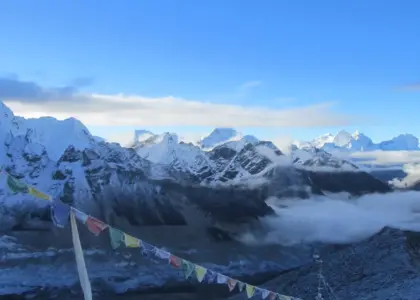
After leaving the Everest base camp, you can go to Kala Pathar. The Kalapatthar is 19000 feet higher than Everest Base Camp. The Kala Pathar is optional, so you must get up early for that hike. You must get up at 3 am and begin the walk to reach the summit of Kala Pathar by 5 am. The entire Khumbu region and Everest’s summit can be seen with the sun rising on their backsides.
Although it’s optional and entirely depends on your stamina, it’s the most visited place after you reach it. As the altitude increases, the view of the peak of Everest becomes more visible, and the scenery is quite stunning.
I did it, and it was the happiest experience of my life. It is worthwhile, but the walk to Kalapathar is only short because you must return to Gorak Shep after the trek and witness the sunrise before continuing to your following location.
But some hikers choose to watch the sunset at Kalapathar. On the same day, they climbed Everest base camp, returned to Gorakshep, and hiked toward Kalapathar.
According to our plan, Pheriche was the next stop. We arrived in Pheriche, where we had a wonderful lunch and spent the remainder of the day.
Day 11: Pheriche to Debuche
Due to the need to descend gradually during the walk, Debuche was the next stop after Pheriche.
Day 12: Debuche to Namche Bazaar
We proceed to Debuche for a short breakfast before heading back to Namche. Descending can be done as quickly as possible afterward. The peak traffic month for expeditions is March. Many porters are moving supplies to the base camp for climbers planning to reach this summit. Since the walk is primarily downhill and the level of oxygen in the air rises with decreasing height, it feels more manageable.
Once you get to Namche Bazaar after Debuche, you may nearly consider the trek over because it becomes easier as you continue to Lukla from Namche Bazaar.
Day 13: Namche to Lukla.
We make the entire hiking Mt Everest journey back to Lukla. Even though it was a long descent day, we made it. Of course, everyone will feel exhausted after such a lengthy journey. You will, therefore, be eager to return to normality and a regular lifestyle. It would help if you were there before taking a flight back to Kathmandu from Lukla.
But I’ll be honest: occasionally, there are no flights from Lukla because of the unpredictable weather. Sometimes, flights are canceled. There are periods when no flights are available. Since the weather was so severe and I couldn’t catch a flight back, I had to spend an extra night in Lukla.
[contact-form-7 id=”4615″ title=”inside”]
Last day: fly to Kathmandu
Flights depart early in the morning for Kathmandu after our hiking Mt Everest trek. But when you do return to Kathmandu by plane, it’s like a breath of fresh air.
After returning to Kathmandu, You have two options: take a flight back to your nation or spend one more night there and enjoy the atmosphere. Therefore, you can plan your lodging accordingly, whether you want to stay in Kathmandu or return the same day. So, this was the entire itinerary, or at least what I did and followed.
Although many different itineraries are available online, if you are arranging your trek on your own, this can be an excellent place to start. In this post, I’ve covered everything you need to know about hiking Mount Everest, including where to stay, how to reserve lodging, what to eat, and other details.
Disclaimer: I had to follow their hiking agenda due to the company I was traveling with. However, it is acceptable to pursue a different itinerary because of other online itinerary advice you saw or because you are traveling with a different company.
Hiking Mt Everest: Tips and Techniques
Following that, I’ll discuss several considerations you should make when planning plans for this trip. These crucial tips and methods can help you save time, money, and effort. So, I’ve gathered all the relevant information I could find here or that I could recall off the top of my head.
Get Travel Insurance
Therefore, the first thing you need to do before beginning your hiking Mt Everest journey is to seek travel insurance, particularly from a good travel insurance company. They offer travel insurance. Your travel insurance will cover evacuation and helicopter evacuation if required because you’re going on a high-altitude trip. Therefore, you must always have travel insurance if you become ill. The expense of any incidental injuries you sustain will be paid for. Travel insurance will thus be crucial.
Get Nation SIM cards.
The next step you should take is to purchase an airport SIM card. This is available at the airport and anywhere in Nepal where I suggest you stay. As long as there is a signal, an Ncell sim can make calls and access the Internet. Nevertheless, there won’t be any signal during the entire hike. Finding phone networks becomes more difficult as you ascend and reach higher altitudes.
Internet Facilities is Available
Internet access is available, but if you use it, you will be charged. The Internet must be purchased between treks because it may be critical to certain people.
Do Not Climb More than 400 – 500 m in a Day.
Accordingly, one thing you should remember before beginning the walk is to not ascend above 400–500 meters in a single day. As a result, you may become susceptible to AMS, also known as Acute Mountain Sickness. Therefore, if you are going without a guide, ensure you don’t climb more than this amount to avoid getting sick. However, I advise hiring a guide and a porter for easier trekking. Although it may increase the trip’s expense, I think going with a guide is still preferable.
Acclimatization Day After 600 – 900 m
As I specified in the itinerary, a rest day should be taken every 600 to 900 meters. The rest of the days are a few days in between. Rest on those days to acclimate again and avoid being susceptible to AMS.
Lodges Are Available At Every Place
There is suitable accommodation in lodges in any location you visit. It is preferable to stay in one of the available lodges rather than pitch a tent because the weather is so cold and harsh. However, tent camping is not very common on this hike.
You Can Even Bathe
These resorts provide excellent amenities, like hot water and internet access. You may almost bathe in some of these resorts, although you must pay to use the bathroom after a certain height. You will find it difficult to remove your warm clothing and bathe, but you can do so during the first five to six days of trek.
Lodges Can Be Booked on the Spot
Lodges can be reserved right away. Suppose you haven’t already done so on the Internet. In that case, you can ask the lodge owner at a specific lodge at a particular height to book a place for you at the following destination because they are coordinated with one another.
So, if your tour schedule is highly flexible and you haven’t made many advanced plans, you can also embark on a trip where you can let the proprietor of the next lodge know that you’ll be getting there; in this manner, your lodging will be reserved in advance. You can use these tactics if you’re trekking alone without a guide or company.
Dal Bhat Is The Best Food Option
The most excellent choice is a meal with rice and lentils (Dal Bhat), which offers total carbohydrates. In this hiking Mt Everest journey, a full day of walking is required. To keep your stomach full and prevent getting sick, you must consume a lot of food high in carbohydrates. So, besides breakfast, you must finish a packed lunch and dinner meal. Of course, this will increase the cost of the trek, but please don’t be cheap on food since you’ll need to consume healthy meals. Therefore, the finest choice is rice and lentils.
You’ll also have different food options, like Pizza and pasta, which completely blows your mind that these things are available even at such a high altitude. These types of food selections are also more pricey. Incredibly, these are at such a high altitude because the lodge owners there can only afford them with the help of expensive porters or helicopters.
They purchase all of these items and prepare them in advance so that you can eat them. They will, therefore, have a wide selection of cuisine available for you. However, if I’m being sincere, the best food quality is only available up to Namche Bazaar; beyond that, even if your lunch is quite substantial, many other options will be available.
After Namche Bazaar, food may not be of the highest quality or taste. Although it is a high-altitude trek, kindly make the necessary adjustments. At the very least, don’t expect too much from the food’s flavor and variety options at higher altitudes.
Drink at least 3 liters of water daily for hiking Mt Everest.
Drink at least 2 liters of water daily to prevent illness. Staying hydrated throughout the hike is crucial.
Take Diamox to prevent AMS.
Taking a prescribed regimen of Diamox together with water helps prevent high-altitude sickness. I was taking half a tablet in the morning and half a tablet in the afternoon, administered by the coordinator with us because he had already completed a course in sports medicine and trekking and hiking in general. Diamox is available over the counter and in almost all drug stores, but how much you switch taking is something you should discuss with a doctor. Our guide gave us Diamox after Namche Bazaar, ensuring we took that amount.
Read up on AMS
Before you hike Mt Everest, please educate yourself about AMS and other forms of altitude sickness. Do not ignore any symptoms; see a specialist or the trek leader if you are ill. The trek coordinators are knowledgeable and ready to assist you. Therefore, don’t underestimate any symptoms.
However, occasional shortness of breath is usual. Higher heights will make you feel out of breath. However, occasional shortness of breath is usual. Higher heights will make you feel out of breath. I even became out of breath when ascending repeatedly. Therefore, it is expected to feel out of breath, especially if you climb stairs after a day of trekking. As soon as you reach 10,000 feet or higher, you will feel a little out of breath if you are walking around your lodge after a hike, so don’t ignore any symptoms of mountain sickness.
Sleeping bags are a must.
Even though you stay in accommodations with beds and linens, you should still carry a sleeping bag. It is because four walls enclose you in a room and will become increasingly cold as the temperature drops. At a certain point, you will undoubtedly need a sleeping bag to protect you from those frigid temperatures, so carrying a sleeping bag is essential.
Avoid drinking Alcohol and Smoking.
While you are hiking, avoid drinking and smoking at all costs. When climbing your body somewhere where there is a lot of water, you need to retain water in your body as much as possible, so please refrain from indulging yourself. You will witness a lot of snaps and several temperatures. Alcohol often causes dehydration. Therefore, if you can, please stay away from drinking alcohol at all hours of the day or night and do not smoke either. Don’t eat anything that isn’t vegetarian.
You can also choose to eat non-vegetarian meals while on the hike. You are considering that at least all lodge owners will offer those products on the menu. However, I would advise against eating non-vegetarian food because you cannot be sure of its quality.
Training for Hiking Mt Everest
One of the most frequently asked questions is, “How fit do I need to be to hike Mt Everest?” A workout routine that combines training for all the major muscular groups—especially the back, thighs, and calves—with training for cardio endurance. The best exercise is consistent hill walking with a load on, accruing miles over time. Having maturity, patience, and a love of the mountains is crucial.
However, in this post, I’ll outline the details of the physical requirements of the journey as well as the most crucial aspects of preparation to ensure that you can accomplish the trip in its entirety. In this article, I share my opinions on travel recommendations and fitness advice, all taken from the trekking FAQ, which is meant to keep you educated and fit for the mountains. In this post, I’ll review the four things you can do to prepare for the Everest Base Camp Trek.
Boost your Immunity
The first is an immune system boost. Living in the mountains, especially at high altitudes, is quite exhausting. Your body will be weakened, making you more susceptible to illness. This is particularly the case for the Khumbu Valley, where the hiking Mt Everest base camp is located because many visitors bring bacterial infections. Not to mention that the standards for food preparation, water quality, and hygiene are often much lower than those in the Western world.
What precisely can you do to strengthen your immunity? The simplest solution is to work out regularly before hiking the Everest trip. Naturally, adjusting your diet and eating healthily for at least six weeks before your journey will help to strengthen your immunity. Additionally, there are some things that you can eat that have been shown to increase immunity.
Go hiking
Going hiking is option number two. If you train wisely for the hiking Mt Everest, you’ll do a lot of hiking. This is crucial to gain experience and increase muscular power so you won’t have daily muscle aches when traveling. Experienced hikers can make the most of their bodies and equipment in the mountains. They react more quickly than ordinary individuals. They are balanced, and when moving over slick surfaces such as moose rocks, ice, and snow, which you will, these items help prevent falls and accidents.
The biggest problem is that, if they’re lucky, most people can only go trekking once or twice a week. If that’s your only training, you’ll find yourself straining, huffing, and wheezing your way up the mountain. Let’s face it: trekking at sea level doesn’t use much of your cardiovascular system.
Therefore, we must take another action. However, most trekkers claimed that reaching Everest Base Camp was not the most complex or challenging day. The day after, they climbed up Kala Pathar after hiking Mt Everest Base Camp.
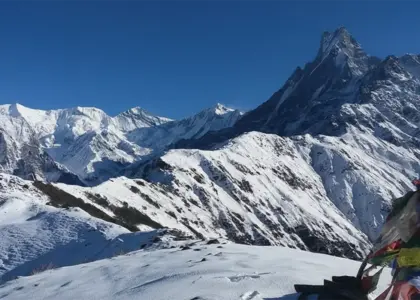
Perhaps the trek’s most breathtaking viewpoint is Kala Patthar. At 5545 meters, it is higher than Everest Base Camp. Therefore, keep that in mind. You don’t want to exert yourself on the day you go hiking Mt Everest Base Camp only to be too exhausted to get out of bed and go on the optional side trip, which is generally considered the trip’s highlight.
Early in the morning is when Kala Patthar constantly ascends. In an ideal world, you would reach the top of Kala Patthar before sunrise, but in reality, you would have to hike up there in the pitch-black, frigid cold with a headlamp. It merely involves taking five or ten steps at once while exerting more wheezing and panting than you ever have in your entire life.
Cardiovascular training
If you want to complete the Kala Patthar without exhausting yourself, you should adequately prepare by engaging in cardiovascular workouts. As mentioned, cardiovascular exercise will benefit you and strengthen your immune system. It will also improve your heart’s health, which is crucial.
At 5000 meters above sea level, there is only approximately one-third as much oxygen accessible as there is, so your heart needs to work much harder to pump that meager amount of oxygen to the organs that require it most throughout your body. Even strolling becomes quite tricky, but for those who put in the effort, it may be a fun experience.
Do strength training.
Strength training is the fourth thing you can do to improve it. Strength training is probably the most underappreciated and least spoken-about component of hiking preparation, and the descent is where it shines. Have you ever gone climbing up a mountain and expended practically all of your energy on the way out so that by the time you reach the base, you barely have any feeling in your legs? Strength training before that is the finest technique to get the muscular system ready for it, especially in the lower back and core legs.
By doing some strength training before your trek, you can reduce your risk of developing delayed onset muscle soreness from the days of hard work ascending and descending mountains and guarantee that you’ll still feel influential on the way down. Exercises like squats, lunges, deadlifts, step-ups and step-downs, glute bridges, and wall-states are all part of my Everest base camp program and are what make a difference. Whether you are fit, just starting, want to train in a team, or wish to keep it simple, training is entirely adaptable to all people.
You can start preparing for your hiking Mt Everest journey by exercising at home. This will put you on the right track to reaching Everest Base Camp and returning with beautiful memories. Therefore, a small amount of physical training and mental preparation is required to ensure that you will be in good enough condition if you wish his trek to be more than just painful and if you want to benefit from this arrangement.
[contact-form-7 id=”4615″ title=”inside”]
FAQs
Is hiking Mount Everest difficult?
Since you don’t need to be an athlete, a marathon runner, or an exceptionally fit to perform this trek, I’ll say it’s not very difficult. However, you should be able to run at least 5 kilometers before attempting it, and you should perform some simple leg exercises because your glutes and cords will be overworked as you walk continuously for the duration of the trip.
Does hiking Mt Everest cost a lot of money?
If I’m being sincere, yes, it is pricey. Additionally, these are incremental expenses you may not be aware of, much like tips you give others. In addition, all billing conditions, such as paying total fees to have your electronic devices charged, paying total fees for food and housing, and paying discharges, will get more expensive as the trek goes on. Since there are no set costs for anything and there aren’t ATMs everywhere, you must always have cash. So, it would help to have a lot of cash (at least 30,000 NPR) when you withdraw money in Kathmandu.
If I’m being sincere, you should have at least that much cash and always pay in cash. You cannot withdraw money while on the hike; you must carry that much cash, and the expedition is pricey. Even after spending so much time on the trek, I felt strange. After paying for the flights and other expenses, I discovered that the expedition was more expensive than I had estimated. Whatever your estimate, the trek will cost you money, so be mentally ready.
How do you make a reservation for a hike on Mt Everest?
When you travel with a company, everything is organized. However, if you want to make reservations in advance, you can speak with guides or porters to make the most of the arrangements in Kathmandu. Once you begin the journey, you will encounter specific challenges.
Most of the time, you can make reservations for various levels in Kathmandu, regardless of your equipment, guides, porters, or anything else. However, if you run into any problems, you may contact the front desk clerk or the lodge owners for advice on how to handle your package where you will stay at the following locations, and more often than not, you’ll find a solution.
What to eat for the trek?
As I’ve already discussed, you will have many options for what you eat. Fresh vegetables are cultivated and served to guests within minutes of being harvested. Traditional Nepali meals are usually served for lunch as they contain more nutrients and carbohydrates than dinner, keeping you fuller for a long time. Additionally, the restaurants serve both Western and Asian cuisine.
You should bring a protein bar so you can consume it while hiking. You can stop at quite a few establishments that serve lunch and dinner, and you can stop at any time you get hungry, except that you must eat dinner at the accommodation. That is the only requirement, then.
Lunch may also be had anywhere along the route, and the lodge will serve breakfast. The meals are offered in huge portions and have a wide variety. Although there is no issue with the cuisine, I still advise avoiding non-vegetarian foods and alcohol during the hike.
Can the average person hike Mt Everest?
It must be challenging to hike Mt. Everest and get to its base camp. Village-to-village trekking requires an average daily distance of five to six miles, although there are considerable distinctions from other hiking. You will be traveling for 10 to 13 days on the trek to the base camp of Mount Everest, which takes more time. All of the trails are pretty spacious. The climb up the valley is pretty comfortable on the hiking Mt Everest trip. You should heed your guide, move slowly, and take care of your hydration.
There is no upper age limit, as children as young as ten have hiked to Everest base camp. It largely depends on whether or not they want to. When they are so young, they must do some picture-viewing and become eager for the trip. They also need to be inspired to do it on their own.
The Everest base camp hike, which goes from village to village very leisurely and comfortably, has also been observed, as has the number of those 65 and older. Additionally, you will have planned and scheduled a few days to do double days and stay two nights at the same lodge.
To acclimate, spend two nights at the same tea house when you reach Namche bazaar on day two of your journey, which is at an elevation of 11500 feet. Usually, after breakfast, the groups want to constantly consider nutrition and hydration to ensure that everyone is adequately nourished.
They think that when you reach Phorche’s elevation of roughly 16000 feet, you’ll need to stay another two days to avoid headaches and other problems. Another crucial period for the body to adjust is at night. The following day is more of a free day for trekkers.
Then, trekkers go from Lobuche to Gorakshep, enter the base camp, and then return from there. If you have questions about hiking Mount Everest, your travel agent and guide can provide detailed information. Ordinary people can hike Mount Everest with the correct information and direction.
Final words
Hiking Mt. Everest is significantly different from hiking any other mountain. To enjoy it, you must be resilient, laser-focused, and self-assured. I enjoy hiking for fun. Traveling with a personal Sherpa guide was a lot of fun, and he did an excellent job of inspiring us. He walked alongside us the entire time as we went through everything.
We enjoyed hiking Mt. Everest by stopping frequently to rest, take pictures, eat snacks, and appreciate the scenery. Our guide sherpa let us take the lead 60% of the time, which was great because I enjoy leading when hiking Mt. Everest.
Hiking Mt Everest takes a lot of endurance and planning, organized by the company we traveled with. On the adventure, the showers and restrooms were excellent, the sleeping accommodations in the lodge were comfy, and the food was delicious.
We had a few concerns because everything was well organized and satisfied our needs. We had a fantastic ascent that was quite successful.
The hiking guides were beneficial and knowledgeable, and they were there when we needed them most. The basic itinerary included the essential details, making getting ready for the hike simple. Most significantly, the leader effectively communicated facts while maintaining high professionalism, respect, and clarity. He played a significant role in the success of our ascent of Mount Everest.
Although it is not a drive-through, you can get your favorite drinks, excellent food made with locally grown vegetables, or any other snack or beverage you can think of on the way. Some fantastic resorts have well-maintained trails, safety fences, and perfect signs for simple navigation.
It felt like a personal achievement I had been considering for a long time. I am delighted with the result. I had a strong sense of assurance and joy when I saw the mountains surrounding me. Being at the summit of Kalapatthar made me happy, excited, and relieved.
The path’s snow and ice sections with steep steps and rock sections up to the village were the only difficulties I encountered while hiking Mt Everest. At the time, one might not have had confidence in their ability to ascend mountains, including on rock and ice. The major obstacle is climbing in low-oxygen environments, where even the most straightforward tasks with a light backpack become physically and mentally draining. However, we were fortunate to complete the hike without serious illnesses or injuries.
Overall, I have to say that hiking Mt Everest is thrilling, challenging, exciting, and fun. I hope sharing my experiences will give you information on hiking Mount Everest. I advise everyone to visit at least once in their lifetime.
Best Price Guaranteed, Easy to change Date, Instant Confirmation
Book This Trip Have Questions?
Talk to Expert
Meet Mr. Purushotam Timalsena (Puru), Nepal's best trek and tour organizer, who has been working in the Himalayas for more than 24 years.
WhatsApp/Viber +977 98510 95 800